Monday, December 30, 2013

Welder's Cap


This was a free pattern designed by Seamingly Simple and promoted by Ricochet and Away. I love the stripe she used in her version. In my stash I had a thrifted pair of shorts with a similar pattern. I had to piece the band of the cap, since the pieces of fabric I salvaged weren't wide enough, but I never mind doing that. I lined the cap with a quilting fabric I had on hand, but made the band on that side from the stripe, though run vertically for a bit of extra interest. The cap is fully reversible.


One interesting thing about this pattern is that the six crown sections are not alike. The two side pieces are of a slightly different shape which makes the cap a tad elongated rather than perfectly round. Which fits a head better, I think. Unless you have a bowling ball head. 


Completed Western-Style Hat

As I expected, that last seam was a doozie. The free arm made it possible. See?:


The brim is extremely stiff and both pieces are quite thick. This is really a job for an industrial machine. I won't make this kind of hat in the same way again. I'll think of another way to get the same result. 

And here is the ugly final seam! It should to be pressed toward the crown and topstitched, then covered with a bit of ribbon, but that is not going to happen. I will just encase it in a light binding and move on.


And here is the finished hat together with the original. Not too shabby, I think.


So, that's tHat! On to the next project. Stay tuned...


Making the Crown

As I mentioned before, I sewed the crown of the hat without stiffener in the side because I thought I could cleverly insert it between this and the lining fabric and thus avoid having to sew the bulky interfacing into the top crown seam. That actually worked pretty well.

First I had to make the lining, which is obviously from the same gray denim:


I have just sewn the crown seam, and now I'm going to topstitch it. Topstitching adds such professional touch! It's easy to do. I align the middle of the left "toe" of my presser foot with the seam crease as I sew. Make sure the seam allowances beneath are pressed so they will be secured in the stitching.


Now the lining looks like this:


Next I cut and inserted a piece of interfacing into the actual crown (outer fabric). As you remember, the top of the crown has already been stiffened. I have held it in place with a line of stitching, but otherwise it floats freely. The lining will hold it in place.


Here's the lining placed inside. Of course, lining and outer fabric are are wrong-sides-together.


I pinned them together, then ran a line of stitching around the raw edge. Below is the finished crown.


Stay tuned...


Sunday, December 29, 2013

Fabric Stiffeners

For my western hat, I decided to use a gray denim I had on hand. It is heavy and supple, like a pair of comfortable jeans. It made a great slouchy bucket hat, as you can see:


I had used a medium-weight fusible interfacing on both brim pieces. That and the concentric lines of stitching gave this brim just the right stiffness. There is no stiffener in the crown. The western-style hat, though, has to be much stiffer, especially the brim.

I looked through the fabric stiffeners I had on hand. I really wanted some buckram, which is like a very, very stiff cheescloth. It's the right thing to use in hats and costumes. But I didn't have any. The only product I had on hand that I thought might work was some stuff that bonds one fabric to another. I decided to give it a try.


The photo above is staged to show how the crown piece fits so neatly inside the brim piece. I actually cut two oval pieces of the denim that were a little larger than the brim pattern, fused those together using the product (think grilled-cheese sandwich), then cut around the outer edge of the brim.

I decided not to reinforce the side piece at this time because I knew that would make sewing the crown seam very difficult. Denim has the ability to be molded a bit, and I wanted the seam at the top of the hat to be very smooth and the side piece to sort of roll over the edge of the crown, as it does in the original hat. The original hat was probably steam-formed after it was constructed. I had to achieve the same look by manipulation of the fabric weave, easing a slightly longer side piece onto the crown piece, and paying attention to the grainline. Bottom line: fused fabric has no ease whatsoever. It is like sewing with a sheet of plastic. So I decided that I would insert the side stiffener between the crown and its lining later, after both sections were constructed, rather than fusing it to either beforehand.

By the way, notice the grainline arrow on the side pattern piece? Disregard it. That piece is cut so that the center front is on the straight-of-grain, and the only seam is at the center back. If you don't follow, don't sweat it. I just didn't want you to make any inference from that arrow, if you were going to, which was an idea I abandoned later for multiple reasons that I'm sure you don't really want to hear about.


Above is the result. As you can see, the flex is about right for a floppy hat. Not right for a western hat. I was going to abandon this piece, but managed to use it after all, as you'll see later.

Note that I sewed the concentric stitching lines and bound the outer edge of the brim now rather than later. In fact, I did this before I cut out the center. It just made sense to do these things before the project became 3-dimensional.

Later version of the same brim with additional stiffener

The photo above shows the brim after I fixed it. I went to Walmart, bought a piece of very stiff interfacing, fused it to a new piece of denim, cut another brim layer from this, then unstitched the bound edge on the droopy brim, laid the new piece on top of it, secured it all together with another session of concentric stitching, and reattached the binding.

This is the kind of thing people do when they're obsessed, no? I'd never do it otherwise. But there is a very great advantage in this kind of striving. It is enormously instructive! I never mind throwing out a project and starting over, even if I've put a great deal of work into it. Some pieces are destined to be just for learning. At this point, I don't know if this hat will be one of them. It's always exciting to be able to solve problems and "stay in the saddle" as long as possible. If I manage to complete a project, that's really great, but the journey is why I do it. Truly.

I'll talk about the crown in the next post.

Stay tuned...


Nearly Done and a New Sewing Machine

The crown is sitting on the brim here but not sewn on yet
I'm further ahead in my sewing than I've explained on this blog. Last night I couldn't stop working, so I only paused long enough to take pictures. I'll post those later. I am ready to sew the very last seam, now, but the hat is so bulky there and the seam so difficult to reach that my reliable little New Home machine isn't up to it. In fact, last night the motor was showing signs of stress.

I know a free arm will allow me to sew this difficult seam, which attaches the crown to the brim. However, my machine doesn't have that feature. Luckily, my neighbor, Jan Sinclair, gave me her machine when she moved into assisted living a few months ago. I hadn't used it yet, so I opened the case to look, and yes! it does have a free arm!

A free arm is just a feature of some home sewing machines where part of the bulk of the machine under the needle -- the machine table -- slips off, leaving only a very narrow bit there. You can easily sew pant legs and shirt cuffs with a free arm, since you can poke that narrow bit into small areas to sew. Free arm machines are convertible, so you can sew with the wide table if you prefer. It's a nice option.

Jan's machine is a nice old metal Kenmore. My kind of machine! I tried it briefly, and it seems to run fine, but I gave it a good oiling before going further. It is very clean inside. I'll bet she hardly used it. It is really like a new machine.

Oiling the "new" machine
It's a lovely, rainy Sunday afternoon here. Though Christmas has come and gone, the leaves are just falling from my backyard maple trees. The ground is a russet gold color so intense I can almost smell it. I took the photo below to show you, but it is not as impressive as the real thing. Can you see the pair of sandhill cranes in the distance at the left?


Stay tuned...

Saturday, December 28, 2013

Tracing the Hat to Make a Pattern

I began to create a pattern for the hat by tracing its form. There are 3 pattern pieces: crown top, crown side, and brim. The hat is symmetrical from side to side, so I only need to trace half of it.


As you can see, I created a lot of matching points, especially where the curves are sharpest. This will help me make sure I'm not stretching a curved edge out of shape when I sew it to a straighter edge. I traced these preliminary pieces on a (makeshift) light table to make the completed pattern pieces shown in the next photo. Notice that a 3/8" seam allowance has been added on all the edges except the outside of the rim, which will be encased in a binding.


(By the way, you can click on any image to open an enlargement of it in a separate window. To go back to the blog post, close the image by clicking on the X in the upper right corner.) 

Stay tuned...


Canvas Sailing Hat

Lately I've been sewing hats. Because of that, I've been looking at a lot of hats, mostly online. I've established a Pinterest board where I drop images of hats that appeal to me so I can get a sense of what I like and what I might like to try to make next.

A couple of days ago, a friend showed me one of his favorite hats. He's sad that it has become sweat-stained, and he also wishes it were a little bit larger. The hat, a western style, intrigued me. It is a sewn hat, made of white canvas. It looks good when worn. What really intrigued me about it is how nicely the brim curves. I tried to understand how this hat was constructed to make that nice curve. This led to my borrowing the hat to study more closely. And that, of course, led to an attempt to duplicate it.

Follow along with me to keep me company on this journey, and please throw your comments or suggestions my way!

This is the hat.
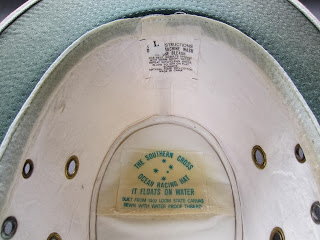
The inside label
I found a very similar hat online, the Canvas Sailing Hat from Greenwich Outdoors, though a few minor details are different (elastic headband, different position for the lacing holes). It is manufactured in China.

It's really interesting to look at something closely and think about how it was made. This hat is made of heavy cotton canvas that has been stiffened with something like fusible interfacing. You can see this stiffener on the inside of the crown. The brim must be stiffened, too, but it is finished with a green fabric. There is a bit of closed cell foam inside the top of the crown, presumably to make the hat float if it is lost overboard, and there is also a sewn-in pocket for storing small flat things like a bit of paper money. There is a binding around the outside edge of the brim.

Stay tuned...